I'll do a step by step process below:-
You will need 2 wood boards of different sizes. Position the small board in the centre of the big board and make a pencil marking around the small board. Add lines for your napkins in the upper left and bottom right corners. Add a frame around the centre block for your grouted area.
Choose
2 different napkins to colour co-ordinate with your choice of paints.
Paint
the 2 corners with 2 coats of white paint so your napkin will show clearly.
In
a small container make a mixture of grout, craft glue and a dab of water. Mix
till you get a toothpaste thickness and paint thickly onto the area around the small block. Dry
till it is soft and almost dry.
Take
a wet crochet doily and press very hard into the partially dried grout to get
the imprint of the doily.
While
this dries apply a thick coat of Smooth Texture paint to the small board using your own pattern in the texture paint.
You
are now going to take tissue paper and crumple it up and then open it out
again. You will decoupage the tissue paper (any colour) to the remaining outer areas of the large board. To decoupage tissue paper, you first paint
Deco Podge on the area and then position your tissue paper and immediately
paint more Deco Podge on top of the tissue paper in an outward motion. Don’t
worry about the creases. Those will add the texture you need in this area. You
will remove all the outer edges once everything is dry.
Position
your napkins in the white painted triangles. To decoupage napkins, place it in
position and using a flat paint brush, brush Deco Podge from the centre
outwards removing air bubbles and creases.
Top left napkin. You can see where I've added pieces to fill the triangle.
Bottom right napkin
Use
a hairdryer on a low setting to dry each process. Dry everything now.
Add
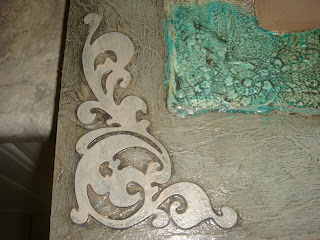
corner embellishments. I’ve used cardboard laser cutouts which I’ve glued with
craft glue.
Apply
a coat of craft paint over the tissue paper and corner embellishments. To get a
leathery colour I’ve used a base light tan colour.
Top right corner embellishment
Bottom left corner embellishment
To
layer paint onto the tissue papered area, I’ve used a copper colour mixed with
glaze and applied in the same way. To allow more paint to stay on, use a dry
cloth and don’t remove as much paint. Remember to apply varnish after each
colour to prevent the colours from lifting when you remove excess paint.

Everything
will look quite gaudy now, so you need to apply a colour wash over
everything. I’ve used a khaki/brown colour mixed with glaze. Wipe off all
excess paint and this will tone everything down leaving a distressed look. The
glaze allows the paint to dry slower giving you time to clean as much off as
you like.
Using
a stencil in the same khaki/brown colour, apply with a dry brush dabbing the
paint onto the stencil.
Note the texture paint
Glue
a piece of patterned lace around the sides of the small board. Apply the same
dark colour with a dry brush to accentuate the pattern of the lace.
Apply
a coat of varnish to everything.
Once
dry use a file to remove all the tissue paper and napkin edges around the big
board. Paint the sides of your board. I’ve used a mix of the copper and light
tan.
Using
a strong craft paint, glue your small board onto the big board in the centre.
I’ve
added a piece of trim using a hot glue gun to hide any imperfections and open
areas around the small block.
Your
picture is now ready to hang.


Really beautiful, thanks for sharing the instructions.
ReplyDelete