Wednesday 5th Dec. Lunch at Wingers - sticky chicken strips. Doesn't this look delicious!
Sunday 16 December 2012
A winter wonderland
Spending a month in the US...what a wonderful way to spend Christmas and New Year. It feels so normal to be here.
Wednesday 5th Dec. Lunch at Wingers - sticky chicken strips. Doesn't this look delicious!
Thursday 6th Dec. Strawberry cheesecake french toast and coffee for breakfast at the Egg Factory and shopping with friends at Tai Pan Christmas Store. Have a look at some of these stunning Christmas trees.
Wednesday 5th Dec. Lunch at Wingers - sticky chicken strips. Doesn't this look delicious!
Tuesday 20 November 2012
Collage Canvas
I signed up for a class for this project. I learned many different techniques and the class lasted about 5 hours. I am delighted with the end result which fits in perfectly with my decor in my living room.
I'll do a step by step process below:-
You will need 2 wood boards of different sizes. Position the small board in the centre of the big board and make a pencil marking around the small board. Add lines for your napkins in the upper left and bottom right corners. Add a frame around the centre block for your grouted area.
Open
out your napkin on your board to see layout of design. If your triangle area is
too big, you will have to add pieces of the napkin to fill the area. All edges
must be torn. To do this take a clean wet paintbrush and draw a line where you
want to tear the napkin. Each napkin has 3 layers. Pull the back layer off. The
middle layer will be quite hard to separate so use 2 small pieces of Prestik on
either side and pull the layers apart gently. Allow your torn pieces of the
napkins to dry.

Dab
the corner accents with the same colour so they stand out.
I'll do a step by step process below:-
You will need 2 wood boards of different sizes. Position the small board in the centre of the big board and make a pencil marking around the small board. Add lines for your napkins in the upper left and bottom right corners. Add a frame around the centre block for your grouted area.
Choose
2 different napkins to colour co-ordinate with your choice of paints.
Paint
the 2 corners with 2 coats of white paint so your napkin will show clearly.
In
a small container make a mixture of grout, craft glue and a dab of water. Mix
till you get a toothpaste thickness and paint thickly onto the area around the small block. Dry
till it is soft and almost dry.
Take
a wet crochet doily and press very hard into the partially dried grout to get
the imprint of the doily.
While
this dries apply a thick coat of Smooth Texture paint to the small board using your own pattern in the texture paint.
You
are now going to take tissue paper and crumple it up and then open it out
again. You will decoupage the tissue paper (any colour) to the remaining outer areas of the large board. To decoupage tissue paper, you first paint
Deco Podge on the area and then position your tissue paper and immediately
paint more Deco Podge on top of the tissue paper in an outward motion. Don’t
worry about the creases. Those will add the texture you need in this area. You
will remove all the outer edges once everything is dry.
Position
your napkins in the white painted triangles. To decoupage napkins, place it in
position and using a flat paint brush, brush Deco Podge from the centre
outwards removing air bubbles and creases.
Top left napkin. You can see where I've added pieces to fill the triangle.
Bottom right napkin
Use
a hairdryer on a low setting to dry each process. Dry everything now.
Add
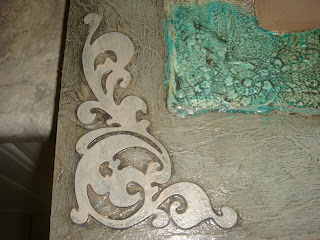
corner embellishments. I’ve used cardboard laser cutouts which I’ve glued with
craft glue.
Apply
a coat of craft paint over the tissue paper and corner embellishments. To get a
leathery colour I’ve used a base light tan colour.
Top right corner embellishment
Bottom left corner embellishment
To
layer paint onto the tissue papered area, I’ve used a copper colour mixed with
glaze and applied in the same way. To allow more paint to stay on, use a dry
cloth and don’t remove as much paint. Remember to apply varnish after each
colour to prevent the colours from lifting when you remove excess paint.

Everything
will look quite gaudy now, so you need to apply a colour wash over
everything. I’ve used a khaki/brown colour mixed with glaze. Wipe off all
excess paint and this will tone everything down leaving a distressed look. The
glaze allows the paint to dry slower giving you time to clean as much off as
you like.
Using
a stencil in the same khaki/brown colour, apply with a dry brush dabbing the
paint onto the stencil.
Note the texture paint
Glue
a piece of patterned lace around the sides of the small board. Apply the same
dark colour with a dry brush to accentuate the pattern of the lace.
Apply
a coat of varnish to everything.
Once
dry use a file to remove all the tissue paper and napkin edges around the big
board. Paint the sides of your board. I’ve used a mix of the copper and light
tan.
Using
a strong craft paint, glue your small board onto the big board in the centre.
I’ve
added a piece of trim using a hot glue gun to hide any imperfections and open
areas around the small block.
Your
picture is now ready to hang.
Mosaic heart mirror
There is a wonderful craft market called Mosaiek which is held in October every year. I found some lovely goodies there including these tile inserts which I used on the frame of this mirror.
Sunday 18 November 2012
Family Card Challenge 22 - Christmas using green and red
I really enjoyed making this card because I got to use some new goodies I bought. The patterned paper is from “Yuletide” paper pack from We R Memory Keepers. The red paper is Spotted Core’dinations which I sanded with a little distressing tool called Heart Attack. I sewed them together with a decorative stitch. I coloured in a Tilda and Magnolia Christmas envelope stamp with my Copics and Diamond and Crystal Stickles. The Merry Christmas is from a pack I bought at a market recently. The green and white brad is part of the Yuletide range. I used some Tea Dye distress ink on the edges of the stamp and tag. Some glittered pearls and a Prima rose finish it off.
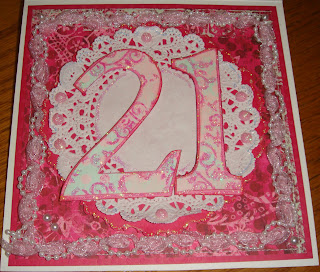
Family Card Challenge 21 - 21st or other number birthday
I coloured in a Gurlee Girl stamp with Copics and used Crystal Stickles on her belt and shoes. The backing paper is Bo Bunny with a Bazzill dotted swiss border. I sewed a doily to a circle I cut out with a decorative scissors. I added some Prima roses and flowers and some sticky pearls in the corners. I stuck a Happy Birthday on of the petals.
For the inside of the card, I did 2 pages, both using Bo Bunny paper. I made a tag to write on and used a Martha Stewart border punch on the top. The other page I stuck some lace and pearls on with glue dots to border the page. I traced the 21 Linda made for me and cut out by hand the new 21 and used Stickles on it. I made another circle and doily and used thick double sided tape to attach the 21.

Front of the card
Inside left of the card
Inside right of the card
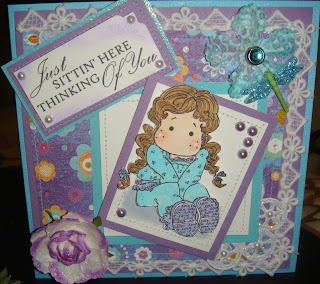
Family Card Challenge 20 - Turquoise
I used a new Tilda stamp I just got. I love this stamp and I had ordered it months ago and forgot it would be in my package which I got yesterday. I coloured her in with Copics and Stickles and sewed some heart and flower cotton lace around the border. I added a doily and Prima flowers with a gem brad and a dragonfly and a few sticky pearls to finish it off. The words are a Magnolia stamp.
Family Card Challenge 19 - Autumn/Rock/Harvest
I chose the harvest / thanksgiving theme for this card.
My stamp is from Pretty Little Stamps coloured in with Copics and Stickles. The heart is cut out from a K&Co paper pad. I used 3 stamps from a Thanksgiving stamp pack for the words. The copper leaf is from a pack of leaves by Decorative Accents and I added some Prima mini roses, and sticky pearls to embellish the edges and used a Fiskars corner punch on the stamped image. I inked the edges with Tea Dye Distress Ink.
Family Card Challenge 18 - Sibling
I had chosen my stamp days ago but changed my selection of papers a few times before I liked the combination. I coloured the Tilda stamp in with Copics and used Stickles on the trim of their dresses. I used a Martha Stewart punch for the lacy border in the centre. I found a Sister charm in my collection of metal charms and added some Prima flowers and roses. The words are from a card I saw in a store today.
Front of the card
Inside of the card
Family Card Challenge 17 - Brand New Stamp
I used a Gurlee Girl "Cammy in the Wind" stamp. I coloured her in with Copics and added some Frosted Lace Stickles. The buttlerfly is one I bought on Etsy years ago and the Butterfly Kisses sticker is from K &Co. I sewed some lace behind the stamped image and added some Prima flowers with little rose centres and some "Say it with Crystals" swirls.
The inside I used more of the Bo Bunny paper and sewed some lace around the edges. I used a ribbon slider heart on the tag. The Believe sticker is from same K&Co. sticker pack.
Front of the card
Inside of the card
Family Card Challenge 16 - Martha Mania
I enjoyed this challenge once I finally got started. I punched a bunch of papers I wanted to use (Bo Bunny Love Shack) and eventually liked the brown with pink dots and coloured the stamped image to match the papers, opposite to what I usually do. The stamp is one of my sister's which we stamped on my last visit. I used two Martha Stewart punches on the front of the card, Floral Vine and Monarch Butterfly. I stickled the butterflies. I used a Fiskars punch on the corners of the word paper and added some sticky gems.
On the inside I used a the Eyelet Lace around the page punch.
Front of the card
Inside of the card
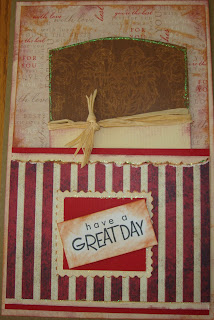
Family Card Challenge 15 - Distress Mania
Since stamp collecting is an age-old hobby, and I pictured a distressed look to my card rather than colouring in a stamp with distress ink, I decided to use a sheet of stamp paper that I found last week at the craft store. I tore the edges and inked them with Tea Dye distress ink and Burnt Copper ColorBox Queue ink. All the edges of every paper has either torn or cut and has been inked with these colours. The striped paper and the paisley is a reversible sheet of paper I found to colour co-ordinate with the stamp paper. I used a pinking shears which resembles the edge of a stamp for the borders of the small cut outs. The inside left of the card has a removable tag around which I tied some raffia. The right side of the inside I use my Cuttlebug to emboss the Happy Birthday paper and ran my ink pads over it and stickled parts of it.
Front of the card
Inside left of the card with removable tag
Inside right of the card
Monday 8 October 2012
Decoupage and crackled finish
At our monthly craft day I first painted the wooden tray, coasters, coaster holder and eyeliner holder. I added crackle glaze and then added a top coat of white paint. I decoupaged the pieces with one of the "Fat Lady" papers. A bit risque but perfect for use in the bedroom!
Mosaic Mirror
Once a month I attend a craft day with some wonderful ladies. They do decoupage and mosaic. I have been admiring their works of art and finally decided to try one of my own. This mirror came in a kit with all the tiles already cut. I enjoyed this project so much. I can't wait to start on my next one.
Thursday 27 September 2012
Every day is a gift...
These S.W.A.L.K. stamps are adorable. I have coloured her in with Copic markers. I used Bo Bunny patterned paper. The card has been embellished with sticky pearls, ribbon and Stickles. The inside of the card has an oval tag cut out with a Nestabilities.
Front of the card
Inside of the card
Family Card Challenge 14 - Silver / Grey
I found some silver/grey paper from the Glitter Stack paper pad and had coloured in a Magnolia Edwin stamp a while ago that I never used which matched perfectly. Edwin is cut out with a Nestabilities and the edges inked and Stickled, I've used a Shapeabilities under the "You're a Star!" title and the bottom left corner. I used a Martha Stewart Around the Page punch and some red sticky pearls to finish it off.
Friday 14 September 2012
Family Card Challenge 13 - Polka Dots and Pearls
I searched through my papers and found this sheet of paper with polka dot dresses after a few unsuccesful trips to the craft stores. I coloured a Lili of the Valley stamp in the same colours and glued a pearl border around it.Isn't she adorable? I used a Martha Stewart lace border punch below the image and inked the edges. I added some cute charms from a recent shopping expedition. I sewed some lovely lace behind the paper and added some Prima roses and sticky pearls. The Love stamp is from a collection by Scrappy Cat Love and Cherish series.
Thursday 13 September 2012
Some other hobbies of mine
I also love to do Paint by Numbers. This one reminds be of Boise, Idaho where we lived for 10 years. Every year they would have the Boise River Festival showing off their hot air balloons. Hundreds of people gather early in the morning to see the hot air balloons take off. They fill the sky, all different designs - Energiser Bunny, trucks, Tigger, you name it, there's one there. In the evening they have another flight by dusk. It's beautiful to see. Great memories!
A set of 4 flowers:-
Lemon and Orange Trees:-
Cottages:-
English Cottage
Lighthouse
Twilight Cottage
Stonehedge Bridge
Animals:-
Roman Leopard
Incredible Cats
Midnight Swim
Subscribe to:
Posts (Atom)


